


What is Botpress?
Botpress is an open-source drag-and-drop platform designed to build and deploy AI agents (bots), such as chatbots and voice assistants. It gives you powerful tools to create conversational experiences without building everything from scratch!
What makes Botpress stand out is its visual flow editor. If you’re a visual thinker, being able to map out conversation flows like a flowchart will click in your brain in a way that writing lines of code never would have. You can literally see how your conversations will branch out depending on what users say!
Botpress serves a pretty straightforward purpose: it lets you build, test, and deploy conversational AI without needing to be an AI expert or professional developer.
History & Evolution
Botpress has come a long way since its early days. It was founded in 2016 by Sylvain Perron and his team, who were frustrated with the limitations of existing bot-building platforms. They wanted to create something that balanced accessibility for non-developers and flexibility for more technical users.
Over the years, Botpress has evolved significantly. They’ve added features like advanced NLU capabilities and integrations with major messaging platforms.
How Botpress Fits into the Current AI Agent Development Landscape
Botpress occupies a unique position in the AI development landscape by offering a platform that balances ease of use with advanced customization capabilities. Unlike overly simplistic drag-and-drop builders, Botpress provides a visual workflow design that helps create sophisticated AI agents without extensive coding knowledge.
At the same time, it offers the flexibility and scalability that developers need for complex projects. This makes Botpress an attractive choice for both beginners and experienced developers.
The numbers speak for themselves. Botpress has grown to over 300,000 users that have built over 1.5 million bots. They’ve processed over a billion conversations through their system, which means people aren’t just signing up. They’re actually building and deploying real solutions!
Who is Botpress Best For?
Here’s who Botpress is best for:
- Developers can use Botpress to build customizable chatbots, with tools like a flow builder and built-in AI capabilities. However, its high learning curve makes it better for those with technical expertise.
- Customer support teams can use Botpress to create chatbots that handle inquiries, retrieve account information, and book appointments across various industries.
- Multi-channel companies can use Botpress to implement chatbots across multiple platforms. This includes websites, Facebook, WhatsApp, Telegram, and Slack.
- Large enterprises can use Botpress to implement scalable chatbot solutions. Some notable Botpress clients include Kia and Shell.
- Companies needing tailored solutions can use Botpress to create highly customized chatbot experiences with its flow builder and unlimited variables.
Botpress Key Features
Here are the key features that come with Botpress:
- Visual Flow Builder: A drag-and-drop interface for designing complex conversational flows without coding.
- Advanced AI Capabilities: Includes autonomous nodes, specialized AI agents, and AI cards for intelligent, context-aware interactions.
- Knowledge Base Integration: Connects to structured knowledge sources (websites, documents, etc.) for accurate and contextually relevant answers.
- Multi-Channel Deployment: Supports deployment across various platforms like WhatsApp, Slack, Instagram, and websites.
- Natural Language Processing (NLP): Built-in NLP capabilities for understanding user intents and extracting key information.
- Customization & Extensibility: Highly customizable workflows with unlimited variables and open-source flexibility.
- Analytics & Insights: Tools to monitor chatbot performance and user interactions.
- Integration Capabilities: Integrates with APIs, CRMs, databases, and other business applications.
- Multilingual Support: Automatic translation into over 100 languages for global reach.
- Enterprise Features: Offers enterprise-grade security and scalable infrastructure for large organizations.
How to Use Botpress
Here’s how I used Botpress to create a chatbot from scratch:
- Create an Account
- Create a Bot
- Edit Your Bot
- Access the Flow Editor
- Create a Standard Node
- Add a Text Card
- Add a Multiple Choice Card
- Create Answers
- Connect the Nodes
- Create & Connect More Nodes
- Add Text Cards with Answers
- Test the Bot with the Emulator
- Implement Knowledge Bases
Step 1: Create an Account

I started by going to botpress.com and hitting “Get Started for Free.” If you don’t want to create your own AI agents, you can get Botpress to build for you!

After creating an account, Botpress will start asking a series of questions to get an understanding of your goals and experience. It only takes about a minute to complete!

At the end of the questionnaire was the option to book a 15-minute appointment with an expert builder to scope out your project, prepare a demo for you, and connect you with a partner. This session ensures you get personalized guidance on how to use Botpress effectively.
Step 2: Create a Bot

From here, you’ll want to create your first bot. Click on “Create Bot” and you’ll be prompted to choose a name (this can be changed later).
Step 3: Edit Your Bot

Botpress created a chatbot, which I opened by hitting “Edit in Studio.”
Step 4: Access the Flow Editor

The heart of Botpress is the flow editor, which can be accessed by hitting “Workflows” from the left navigation bar. This is where you’ll spend most of your time building conversation paths.
Step 5: Create a Standard Node

You’ll start with two nodes on either end: “Start” and “End.”
Each flow consists of nodes that represent different stages of a conversation. You connect these nodes to create a natural dialogue flow.
To start adding nodes, right-click on the workspace and hit “Standard node.”
Step 6: Add a Text Card

I named this node “Hello” and hit “Add Card.” This opened a new panel where I could choose the card (action) my AI agent would take.
There were a lot of cards to choose from, but I kept things simple by dragging and dropping the “Text” card onto my node and typing in “Welcome!”
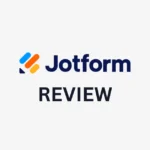
Step 7: Add a Multiple Choice Card
Below the “Welcome!” message, I added another card.
This time it wasn’t a regular text card. Instead, I placed a multiple-choice card below the “Welcome!” message. The question I typed in was “What brings you here today? Are you looking for AI news, research insights, or tools to help your project?”
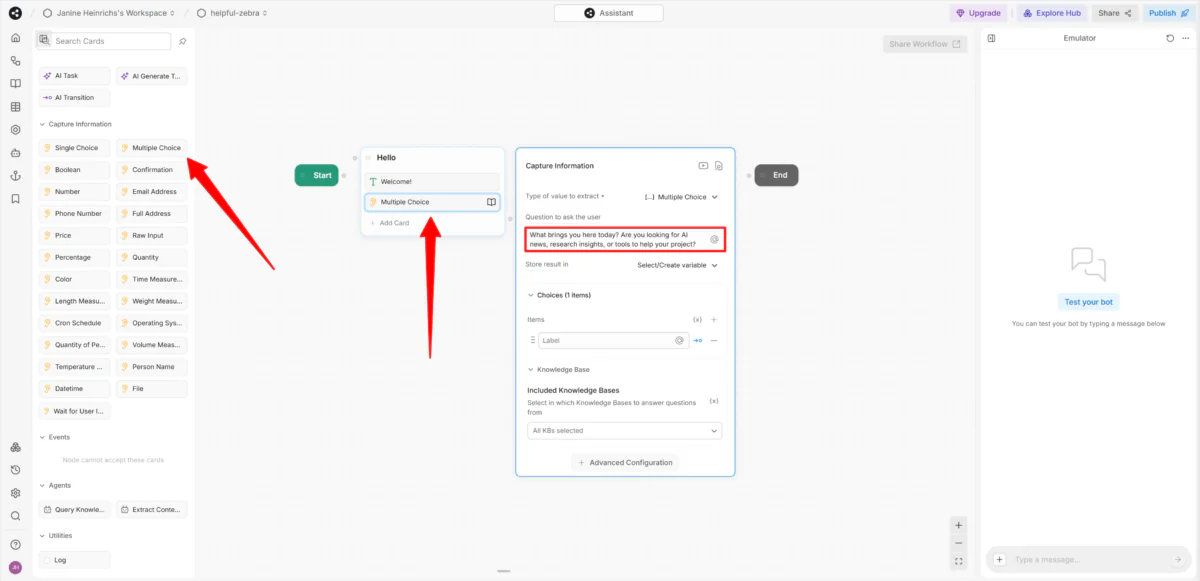
Step 8: Create Answers
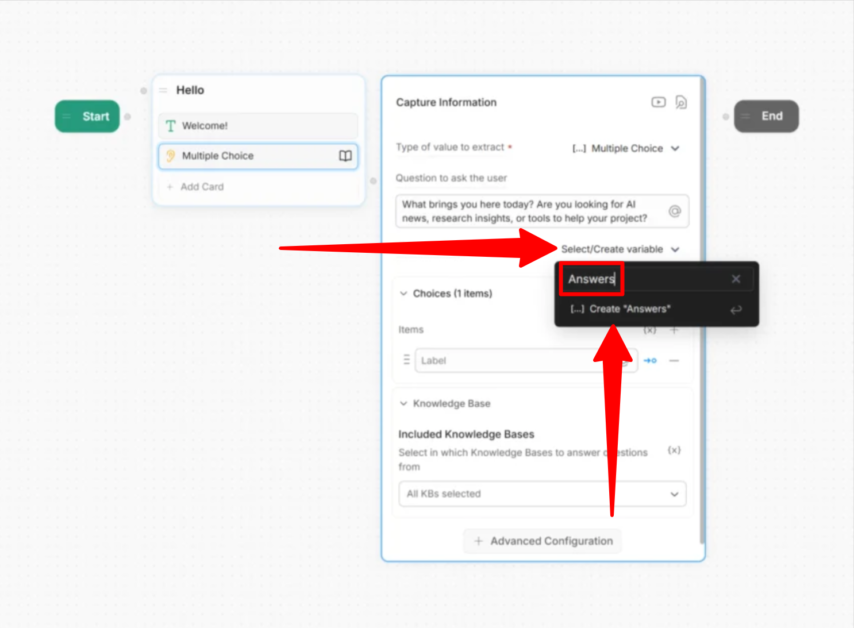
Next, I had to create a place to store my answers. I did this by hitting “Select/Create variable,” and naming it “Answers.”
From there, I created my multiple-choice options. I added three choices: AI news, research insights, and tools to help my project.
Step 9: Connect the Nodes

Once complete, I connected the “Start” node to the “Hello” node by connecting the dots and drawing a line between them.
Step 10: Create & Connect More Nodes
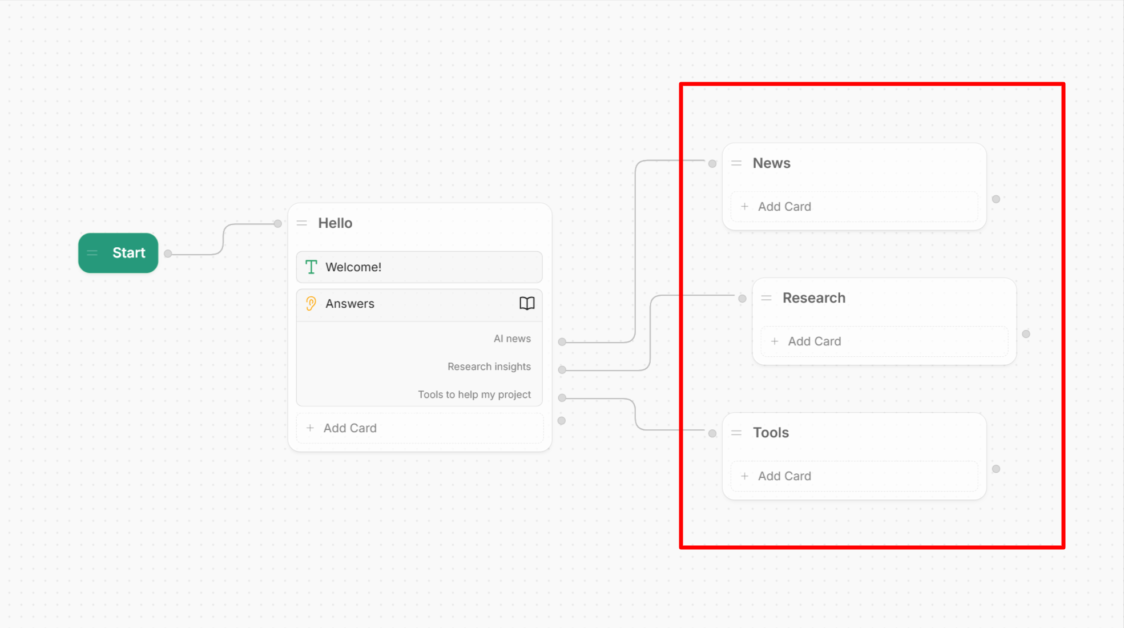
Since I have three different answers people can choose from, that means there are three different paths they can go down.
I created three more standard nodes to represent each of my answers: News, Research, and Tools. I also connected each of these nodes to the corresponding answers from the “Hello” node.
Step 11: Add Text Cards with Answers
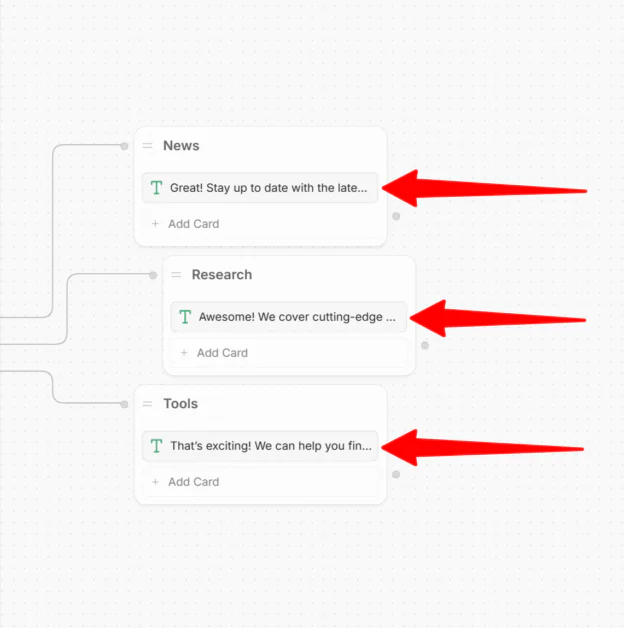
Within these three nodes I added a card of regular text providing an answer.

That’s a really good start to creating a chatbot with Botpress workflows and hopefully gives you a solid idea of how to start creating AI agents with Botpress! For this simple chatbot setup, make sure all of your nodes are connected to the “End” node to properly end the conversation.
Step 12: Test the Bot with the Emulator
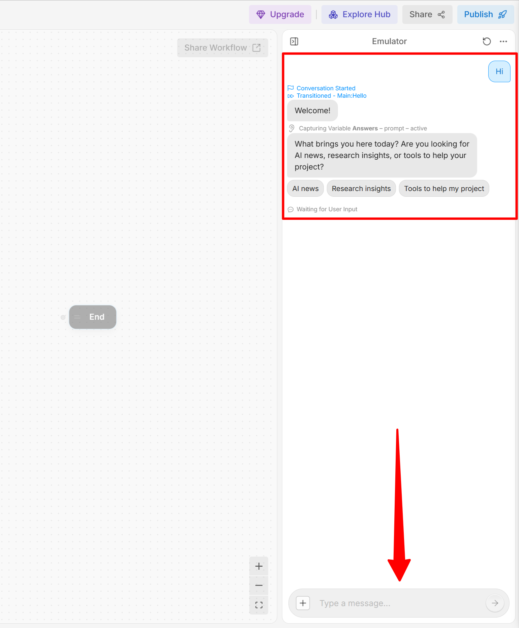
To test the bot out, I went to the emulator in the right panel and sent a message. As expected, my welcome message, questions, and clickable answers appeared.

I selected one of the responses, and an answer appeared leading me to where I wanted to go. Everything worked how I wanted it to!
Step 13: Implement Knowledge Bases
Besides this simple chatbot setup, you can also set up knowledge bases. This allows the chatbot to pull information from a predefined set of documents or data sources. It allows for a more dynamic and intelligent response, helping users find answers to common questions without needing a scripted flow.
You can upload the following types of information for your chatbot to pull information from:
- Website
- Document
- Table
- Web Search
- Rich Text
- Notion
And that’s how easy it is to create a chatbot with Botpress! It seems overwhelming at first, but once you start experimenting, things become more familiar. Plus, Botpress has lots of resources you can turn to if you ever get stuck or want to build something specific.


More Stories
Rock-West.com Review
JustMarkets Review
Jotform Review: The Best Form Builder or Just Overhyped?